This is a crucial element of sustainable living, and using a water butt to collect rainwater is one of the easiest ways to minimize water waste. A water butt connector plays an important role in expanding the storage capacity or enhancing the functionality of your water butt system. The difference made by connectors and accessories may range from connecting many butts to increasing distance from a downpipe while improving the general efficiency. The blog shall highlight the use and benefits of a water butt connector and discuss a few tips for setting it up correctly.
What Is a Butt Connector?
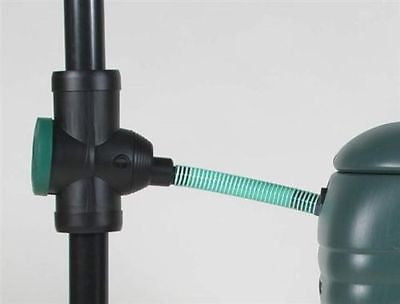
A water butt connector is a simple yet effective tool designed to link water butts or connect diverters and filters to water butts. These connectors ensure a seamless transfer of rainwater from your roof to your storage system or between multiple butts. They help prevent overflow, stagnation, and wastage by enabling efficient water flow. They also allow you to adapt your setup to your garden’s unique requirements.
Why Use a Water Butt Connector?
There are several reasons to include a water butt connector in your rainwater harvesting system:
Expand Storage Capacity: By connecting multiple butts, you can significantly increase your rainwater storage without needing a larger single tank.
Adapt to Layout Constraints: When your water butt is located further away from the downpipe, a connector with an extension hose ensures water reaches the butt without hassle.
Prevent Overflow: Properly installed connectors with diverters prevent excess water from spilling, directing it away efficiently.
Maintain Water Quality: Avoiding stagnant water and airlocks in the pipes ensures clean water and optimal flow.
Choosing the Right Water Butt Connector
Selecting the appropriate connector depends on your specific needs. Here are some common scenarios:
- Connecting Diverters and Filters to Water Butts
Most diverters and filters come with a 30-50cm hose to link them to the water butt. If the distance between the downpipe and the butt exceeds this length, you’ll need a longer hose. Choose a high-quality, ribbed hose to ensure durability and a consistent water flow.
Tip: Place the extension pipe level or sloping down towards the tank. This prevents water in the pipe from becoming stagnant, which may lead to blockages or airlocks.
- Connecting Multiple Water Butts
If you require more storage, you can connect several butts using linking kits. These kits usually contain hoses, connectors, and clamps for a secure and watertight connection. When connecting water butts:
Position them at the same level to ensure even water distribution.
Use straight, elbow, or tee connectors depending on your garden layout.
- Customizing Connections
For bespoke setups, optional accessories like pipe wall clamps, jubilee clips, and connectors help you tailor the system to your needs. Wall clamps are especially useful for fixing hoses along walls, maintaining a tidy appearance and proper alignment.
The correct installation of a water butt connector is important to ensure that water flows efficiently and does not cause problems such as overflow or stagnation. Here are some tips for an easy installation:
Measure the Distance: Before buying an extension hose, measure the exact distance between your downpipe and the water butt. Choose a hose length that provides a bit of flexibility but avoids excessive slack.
Secure Connections: Secure with jubilee clips all hoses onto connectors and fittings. That way, there is no time leakage or disconnection.
Level or Modest Fall: Lay out the extension hose level or with a fall toward the water butt. This encourages laminar water flow and knocks out airlocks.
Quality Accessories: Use robust, weather-resistant materials to make the system long-lasting and reliable. Poor-quality components may deteriorate with time, causing system inefficiencies.
Optional Accessories for Enhanced Functionality
Customize your water butt setup with these optional accessories:
Pipe Wall Clamps: Fix a ribbed hose against a wall using these clamps, keeping it level and secure.
Connectors: Straight, elbow, and tee connectors enable flexibility in connecting hoses and directing the flow of water.
Jubilee Clips: These assist in tightening hoses onto fittings to provide a leak-free connection.
Advantages of an Effective Water Butt System
A well-designed water butt system with the appropriate connectors and accessories provides several benefits:
Water Saving: Collecting rainwater reduces the need for mains water for gardening, cleaning, or other outdoor purposes.
Water Bill Savings: Save money on water bills by using free rainwater.
Environmental Benefits: Reduce the pressure on local water supplies, especially during dry periods.
Flexibility: A scalable system lets you adjust as your water storage needs change.
Troubleshooting Common Problems
Even with a well-designed system, you may sometimes experience minor issues. Here’s how to resolve them:
Stagnant Water in Pipes: Make sure the hose is level or sloping slightly toward the butt so that water does not stagnate.
Airlocks: Look for kinks or blockages in the hose and reposition the hose so that water flows smoothly.
Leaks at Connections: Tighten jubilee clips or replace worn-out hoses and fittings.
Overflow Problems: Check that the diverter is working properly and not blocked with debris.
Conclusion
A water butt connector is a simple yet essential component for creating an efficient and expandable rainwater harvesting system. Whether you are linking multiple butts or extending the connection from your downpipe, the right tools and accessories make all the difference. By following the tips and recommendations outlined in this guide, you can ensure a seamless setup that maximizes water conservation and supports a sustainable lifestyle. Invest in high-quality connectors and maintain your system regularly to enjoy the full benefits of rainwater harvesting.